Mutton Achar Gosht: Tender, Rich & Aromatic Traditional Gravy
If you are looking for an authentic, restaurant style Achar Gosht Recipe that delivers perfectly tender meat and a rich, tangy gravy, you are in the right place. A comforting, perfectly spiced South Asian dish that tastes like your favorite traditional version completely authentic!
✦ Rich Flavor ✦ Tender Meat ✦ Easy ✦ Indian / Pakistani
20 min Prep Time
45 min Cook Time
65 min Total Time
6 Servings
What is Achar Gosht?
Achar Gosht is a classic, deeply comforting dish of tender goat, lamb, or beef meat cooked with tomatoes, yogurt, and a specialized blend of robust, pickling spices. The key to a majestic curry lies in the infusion of achari masala like fennel, mustard, and nigella seeds which gives the gravy its signature sharp, tangy, and fiery flavor profile.
Whether it is served at a festive gathering or prepared in a home kitchen, this Achar Gosht Recipe represents ultimate comfort food that is loved by food enthusiasts across the UK, US, UAE, and beyond.
Why You Will Love This Recipe?
Super Easy
Designed with straightforward steps so anyone can master cooking red meat perfectly at home.
Melt-in-Your-Mouth Texture
The slow-cooking technique ensures the meat absorbs the tangy spices while remaining incredibly juicy and tender.
Authentic Homemade Masala
Skip the store-bought packets! This recipe uses a freshly ground, balanced spice mix that guarantees premium aroma without any unwanted bitterness.
The Ultimate Tangy Kick
The combination of thick yogurt, juicy tomatoes, and special lemon-stuffed green chilies creates an unforgettable, mouth-watering zest in every bite.
The Secret Ingredient: Homemade Achari Masala:
While store-bought spice mixes are convenient, grinding your own fresh Achar Gosht masala takes the flavor profile of your dish to a whole new level.
Homemade Achari Masala Ingredients:
Fennel Seeds (Saunf): 1.5 tbsp
Mustard Seeds (Rai): 1 tbsp
Cumin Seeds (Zeera): 1 tbsp
Coriander Seeds (Sabut Dhania): 1 tbsp
Fenugreek Seeds (Methi Dana): ½ tsp (do not exceed, or it becomes bitter)
Nigella Seeds (Kalonji): 1 tsp (keep whole, do not grind)
Crushed Red Chili Flakes: 1 tbsp
Turmeric Powder (Haldi): ½ tsp
Pro Tip: Lightly dry-roast the fennel, mustard, cumin, and coriander seeds for 60 seconds before coarsely grinding them. Mix in the whole kalonji, red chili flakes, and turmeric afterward.
Main Recipe Ingredients:
For the Chicken & Curry Base:
Chicken: 1 kg (Chicken – bone-in yields the best flavor)
Yogurt (Dahi): 2 cups (whisked smoothly)
Tomatoes: 4 large (finely chopped or pureed)
Ginger-Garlic Paste: 2 tbsp
Oil / Ghee: ½ cup
Lemon Juice: 3-4 tbsp (for spice stuffing)
Fresh Coriander: For garnish
For the Iconic Achari Green Chilies:
Large Green Chilies (Bari Hari Mirch): 6-8 numbers
Prepared Achari Masala: 2 tbsp (saved from the main batch)
Lemon Juice: 2 tbsp
Step-by-Step Cooking Instructions:
Table of Contents:
Step 1: Prep the Stuffed Green Chilies
Step 2: Marinate the Chicken
Step 3: Cook the Curry Base
Step 4: Simmer to Tender Perfection
Step 5: The Grand Finale (Dam)
Step 1: Prep the Stuffed Green Chilies
Make a careful vertical slit along one side of each large green chili. Gently remove the seeds using a small spoon to control the heat level.
In a small bowl, mix 2 tablespoons of your prepared Achari Masala with 2 tablespoons of fresh lemon juice to form a thick paste.
Stuff this tangy paste generously inside the slit green chilies. Set them aside for later.
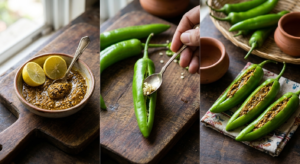
Step 2: Marinate the Chicken
In a large mixing bowl, combine the meat, whisked yogurt, ginger-garlic paste, and the remaining homemade Achari Masala.
Let it marinate for at least 30 minutes (or overnight in the fridge for deeper flavor infusion).
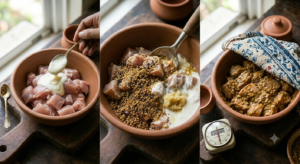
Step 3: Cook the Curry Base
Heat oil or ghee in a heavy-bottomed pot (Karahi) or pressure cooker over medium heat.
Add the chopped or pureed tomatoes and sauté for 4-5 minutes until they soften and the water begins to dry up.
Add the marinated meat mixture into the pot. Turn the heat to high and sauté (Bhunno) for 8-10 minutes until the oil starts separating from the sides and the raw smell of the yogurt disappears.
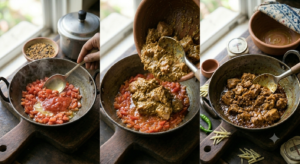
Step 4: Simmer to Tender Perfection
For Chicken: Cover and cook on low-medium heat for 20-25 minutes in its own juices until tender.
For Pressure Cooker: Add 1 cup of water and pressure cook for 12-15 minutes (depending on the meat quality).
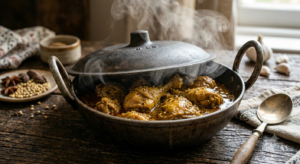
Step 5: The Grand Finale (Dam)
Once the meat is completely tender, adjust the gravy thickness on medium-high heat according to your preference. It should ideally be a thick, masala-rich consistency.
Gently place the stuffed green chilies on top of the curry.
Cover the pot with a tight lid, turn the heat down to the lowest setting, and let it steam (Dam) for 5-7 minutes. This allows the aroma of the stuffed chilies to marry perfectly into the oil layer.
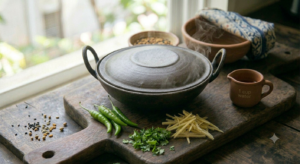
Garnish with freshly chopped coriander and thin ginger juliennes.
Professional Tips for the Perfect HomeKitchen Achar Gosht:
The Kalonji Rule: Never grind the Nigella seeds (Kalonji). Grinding them changes the chemical structure during cooking and turns the entire gravy an unappealing dark grey color.
The Gravy Secret: Authentic Achar Gosht does not traditionally use onions. The thickness and body of the gravy come entirely from the combination of tomatoes and yogurt. Adding onions can make the curry too sweet, ruining the signature tangy balance.
Serving Suggestions: Pair this rich, aromatic curry with crisp, hot Roghnai Naan, fresh Tandoori Roti, or fragrant Zeera rice.
Estimated Nutrition (Per Serving):
Calories: 380 kcal
Protein: 28g
Carbohydrates: 8g
Fat: 26g
Frequently Asked Questions (FAQs)
1. Can I use chicken instead of mutton?
Absolutely! Chicken cooks much faster. Reduce the simmering time to 20 minutes and adjust the water content accordingly.
2. How do I make the curry less spicy?
You can control the spice level by removing all seeds from the large green chilies and reducing the amount of crushed red chili flakes in the masala mix.
3. Why is my Achar Gosht bitter?
Bitterness usually occurs if you add too many fenugreek seeds (Methi Dana) or if you grind the Kalonji. Stick strictly to the measurements provided in this recipe.
Leave a Reply